Featured

Common-exceptions-in selenium-webdriver

What is an Exception?

“An Exception is an event, which occurs during the execution of a program that disrupts the normal flow of the program’s instructions or in simple words, any issue which makes your test case stop in between the execution.”

When exception occurs, the normal flow of program halts & an exception object is created. The program then tries to find someone that can handle the raised exception. The exception object contains a lot of debugging information such as method hierarchy, line number where the exception occurred, type of exception etc. The process of creating the exception object and handing it over to run-time environment is called “throwing the exception”.

Common Exceptions in Selenium WebDriver

There is a complete list of Exceptions in Selenium WebDriver mentioned in the Selenium Doc which you may or may not encounter in course of your testing. Hence in this article we will focus on some most common exceptions in Selenium WebDriver,

  1. ElementNotVisibleException: Although an element is present in the DOM, it is not visible (cannot be interacted with). E.g. Hidden Elements – defined in HTML using type=”hidden”.
  2. ElementNotSelectableException: Although an element is present in the DOM, it may be disabled (cannot be clicked/selected).
  3. InvalidSelectorException: Selector used to find an element does not return a WebElement. Say XPath expression is used which is either syntactically invalid or does not select WebElement.
  4. NoSuchElementException: WebDriver is unable to identify the elements during run time, i.e. FindBy method can’t find the element.
  5. NoSuchFrameException: WebDriver is switching to an invalid frame, which is not available.
  6. NoAlertPresentException: WebDriver is switching to an invalid alert, which is not available.
  7. NoSuchWindowException: WebDriver is switching to an invalid window, which is not available.
  8. StaleElementReferenceException: The referenced element is no longer present on the DOM page (reference to an element is now Stale). E.g. The Element belongs to a different frame than the current one OR the user has navigated away to another page.
  9. SessionNotFoundException: The WebDriver is performing the action immediately after ‘quitting’ the browser.
  10. TimeoutException: The command did not complete in enough time. E.g. the element didn’t display in the specified time. Encountered when working with waits.
  11. WebDriverException: The WebDriver is performing the action immediately after ‘closing’ the browser.

What is Exception Handling?

Exception handling refers to the anticipation, detection, and resolution of exception, i.e. the block of code that processes the exception object.

How to Handle Exceptions in Selenium WebDriver

Try/Catch: A method catches an exception using a combination of the try and catch keywords. Try is the start of the block and Catch is at the end of try block to handle the exceptions. A try/catch block is placed around the code that might generate an exception. Code within a try/catch block is referred to as protected code, and the syntax for using try/catch looks like the following:

try{

// Some code

}

catch(Exception e){

// Code for Handling the exception

}

Below methods can be used to display Exception information:

  • printStackTrace(): prints the stack trace , exception name and description.
  • toString(): returns a text message describing the exception name and description.
  • getMessage(): displays the description of exception

Hope this article helps when you need to look at some of the common exceptions in Selenium WebDriver.

Navigating the Shift to Playwright: A Comprehensive Journey in Automation Framework Enhancement

Introduction

In the ever-evolving landscape of software development, embracing new automation tools like Playwright is pivotal for staying ahead. This blog post delves deeper into our journey of migrating to Playwright, highlighting our comprehensive strategies, the significant enhancements we integrated, and the multifaceted challenges we encountered.

1. The Genesis: Embracing Playwright

Why Playwright?
Our choice of Playwright was driven by its unparalleled capabilities in modern web application handling. Its support for multiple browsers, parallel test executions, and efficient asynchronous operations, coupled with a user-friendly syntax, made it stand out. We were particularly captivated by Playwright’s ability to simulate a vast range of user interactions and its robust API for browser automation, which you can explore in this Playwright API guide.

Migration Strategy
Our strategy was methodical and phased:

  • Phase 1: Conducting a pilot project to test Playwright’s capabilities.
  • Phase 2: Gradual scaling to more complex cases, integrating learnings from each step.
  • Phase 3: Full-scale implementation across the project, with ongoing evaluations and optimizations.
// Example of a Playwright test for multiple browsers
const { chromium, webkit, firefox } = require('playwright');

for (const browserType of [chromium, firefox, webkit]) {
  (async () => {
    const browser = await browserType.launch();
    const page = await browser.newPage();
    await page.goto('https://example.com');
    // other actions...
    await browser.close();
  })();
}

Cross-Browser Testing with Playwright

2. Transformation Strategy

UI Automation Transformations
Our transformation strategy was multifaceted:

  • Adopting a New Schema: Aligning our UI Automation strategy with Playwright’s capabilities.
  • Enhancing Test Scripts: Leveraging Playwright’s features like auto-wait mechanisms and improved selector strategies for more robust test cases.

3. Data Creation and Validation

Dynamic Data Handling
We transitioned from static API identifiers to dynamic IO virtual API calls, enhancing our test case flexibility and robustness. This shift allowed us to create more dynamic and resilient test scenarios, adapting to the ever-changing data requirements of modern web applications.

4. Reporting and Tagging

Advanced Reporting with Reportportal
Our integration with Reportportal revolutionized our reporting capabilities, providing real-time, detailed analytics on our test executions. This integration was pivotal in identifying trends and pinpointing areas for improvement.

Selective Test Execution
Implementing tagging in Playwright enabled us to execute tests selectively, optimizing our testing process by focusing on specific areas of the application, as needed.

5. Code Quality and Maintenance

Ensuring Code Excellence
We adopted stringent code quality measures:

  • Linting: Using tools like ESLint to ensure adherence to coding standards.
  • Refactoring: Regularly updating and optimizing our test scripts.

Robust Cleanup Scripts
Our enhanced cleanup scripts ensured a pristine state for each test run, eliminating the chances of residual data affecting test outcomes.

6. User Experience

Interactive UI for Test Execution
The development of an interactive UI for managing and executing tests marked a significant improvement in our testing process, making it more accessible and efficient.

7. Stability and Modularization

Building a Reliable Testing Environment
We established a comprehensive stability pipeline, including automated health checks and performance monitoring, to ensure consistent and reliable test execution across various environments.

Modular Code for Enhanced Collaboration
Our approach to modularizing the codebase facilitated better collaboration, easier updates, and maintenance, allowing for independent development and testing of modules.

8. Documentation and Best Practices

Creating a Knowledge Base
We compiled extensive documentation on reusable methods and best practices, establishing a solid foundation for current and future team members.

Comprehensive Troubleshooting Guide
Our troubleshooting guide provided step-by-step solutions to common issues, significantly reducing downtime and enhancing productivity.

9. Integrations and Support

Seamless Integration with Tools
Integrating Playwright with tools like email and Jira streamlined our workflow, enhancing communication and task tracking.

Extensive Support for Smooth Adoption
We offered extensive support, including training sessions and dedicated channels, to ensure a smooth transition to Playwright across all projects.

Challenges and Hiccups

Despite a well-planned strategy, our journey was not without its challenges. We encountered issues like:

Learning Curve: The team had to adapt to Playwright’s syntax and features, which required dedicated training and practice.

Tool Compatibility: Ensuring compatibility with our existing tools and systems was a significant hurdle.

Performance Optimization: Fine-tuning Playwright to meet our performance benchmarks took considerable effort.

Conclusion

Our transition to Playwright has been a journey of continuous learning, adaptation, and cultural shift in our approach to testing. As we delve deeper into Playwright’s capabilities, we are better equipped to face the challenges of modern software development, armed with a robust, efficient, and scalable testing framework.

What Is Git ? – Top 20 Git Commands

Git is a free, open source distributed version control system tool designed to handle everything from small to very large projects with speed and efficiency. It was created by Linus Torvalds in 2005 to develop Linux Kernel. Git has the functionality, performance, security and flexibility that most teams and individual developers need. It also serves as an important distributed version-control for Devops tool.

Why Git Came Into Existence?

We all know “Necessity is the mother of all inventions”. And similarly Git was also invented to fulfill certain necessities that the developers faced before Git. So, let us take a step back to learn all about Version Control Systems (VCS) and how Git came into existence.

Version Control is the management of changes to documents, computer programs, large websites and other collection of information.

There are two types of VCS: 

  • Centralized Version Control System (CVCS)
  • Distributed Version Control System (DVCS)

Centralized VCS

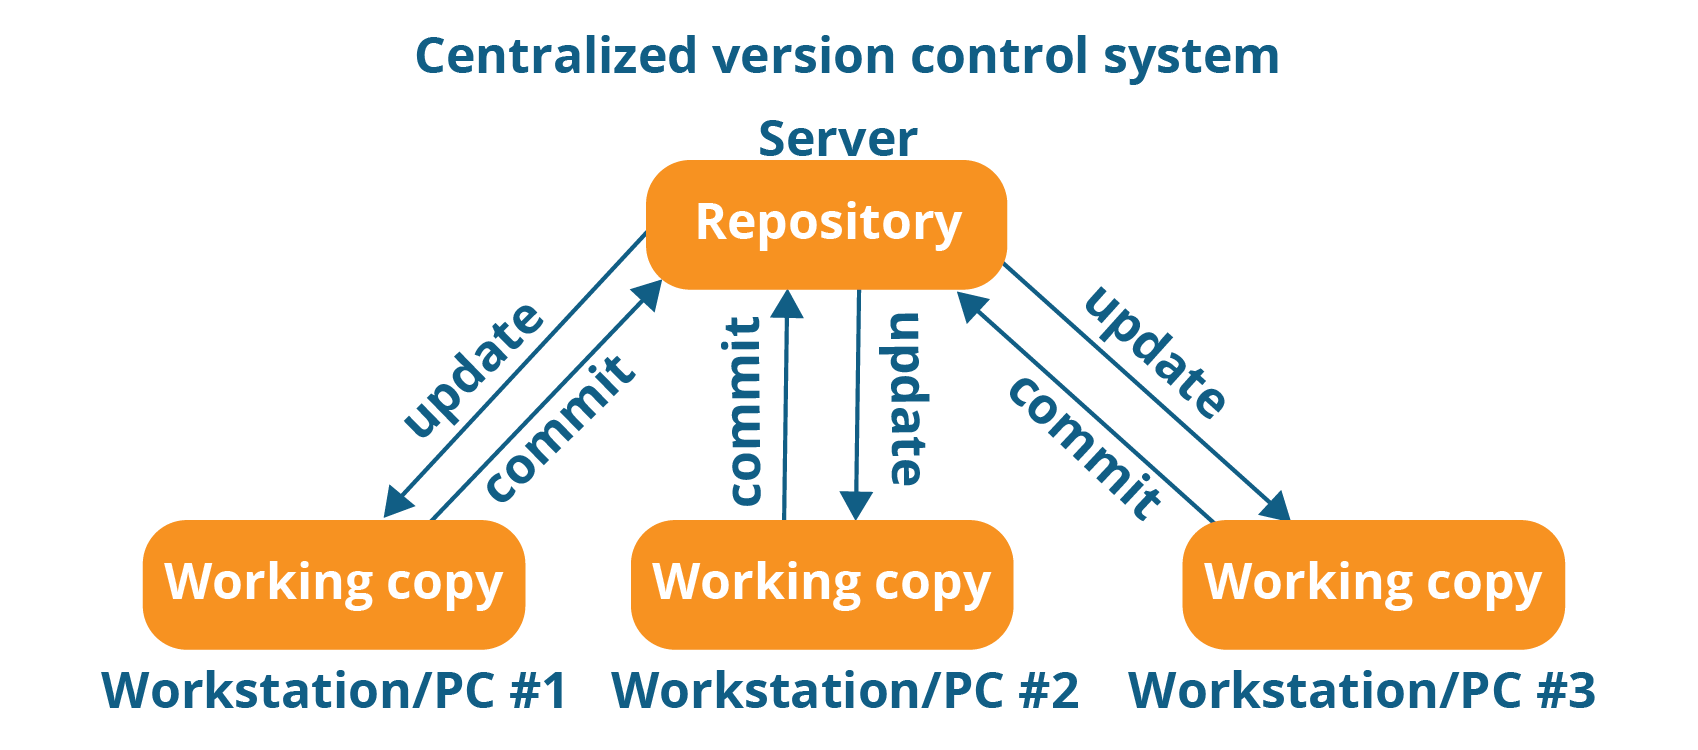
Centralized version control system (CVCS) uses a central server to store all files and enables team collaboration. It works on a single repository to which users can directly access a central server.

Please refer to the diagram below to get a better idea of CVCS:

Centralized Version Control System Workflow - What Is Git - Edureka

The repository in the above diagram indicates a central server that could be local or remote which is directly connected to each of the programmer’s workstation.

Every programmer can extract or update their workstations with the data present in the repository or can make changes to the data or commit in the repository. Every operation is performed directly on the repository.

Even though it seems pretty convenient to maintain a single repository, it has some major drawbacks. Some of them are:

  • It is not locally available; meaning you always need to be connected to a network to perform any action.
  • Since everything is centralized, in any case of the central server getting crashed or corrupted will result in losing the entire data of the project.

This is when Distributed VCS comes to the rescue.

Distributed VCS

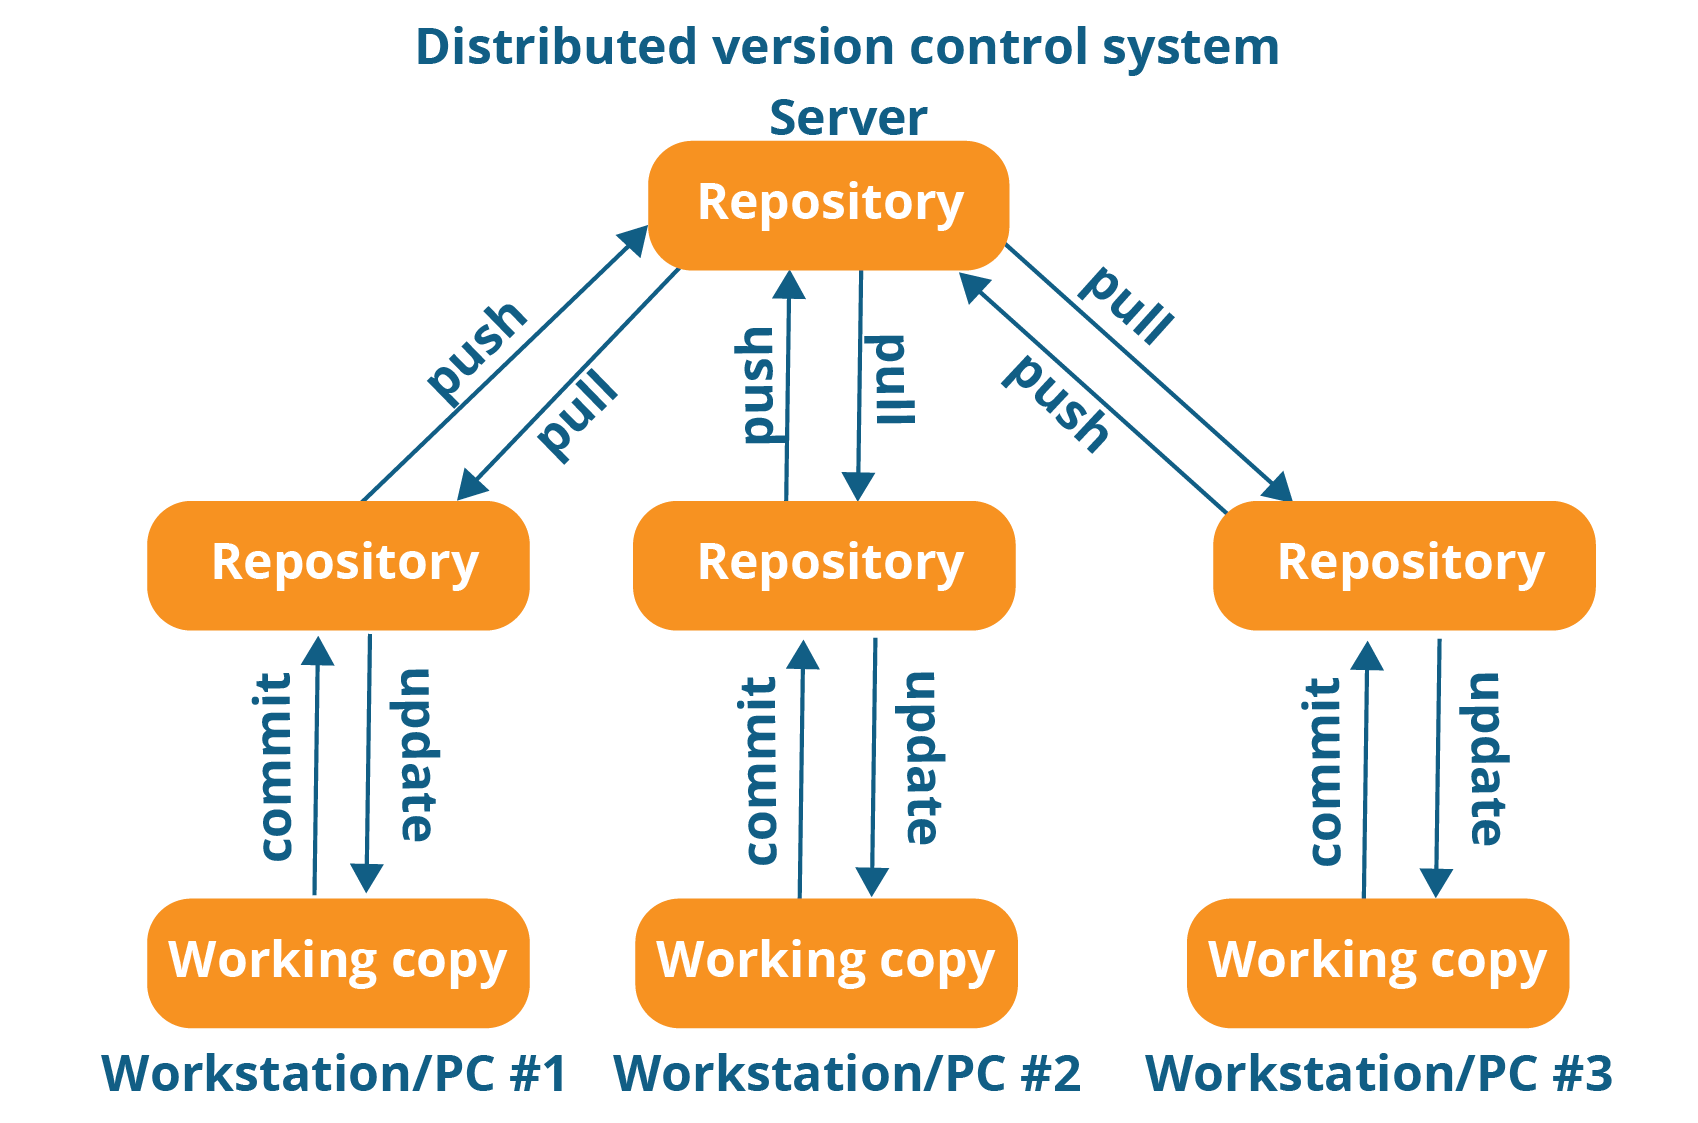
These systems do not necessarily rely on a central server to store all the versions of a project file.

In Distributed VCS, every contributor has a local copy or “clone” of the main repository i.e. everyone maintains a local repository of their own which contains all the files and metadata present in the main repository.

You will understand it better by referring to the diagram below:

Distributed Version Control System Workflow - What Is Git - Edureka

As you can see in the above diagram, every programmer maintains a local repository on its own, which is actually the copy or clone of the central repository on their hard drive. They can commit and update their local repository without any interference.

They can update their local repositories with new data from the central server by an operation called “pull” and affect changes to the main repository by an operation called “push” from their local repository.

The act of cloning an entire repository into your workstation to get a local repository gives you the following advantages:

  • All operations (except push & pull) are very fast because the tool only needs to access the hard drive, not a remote server. Hence, you do not always need an internet connection.
  • Committing new change-sets can be done locally without manipulating the data on the main repository. Once you have a group of changesets ready, you can push them all at once.
  • Since every contributor has a full copy of the project repository, they can share changes with one another if they want to get some feedback before affecting changes in the main repository.
  • If the central server gets crashed at any point of time, the lost data can be easily recovered from any one of the contributor’s local repositories.

Top 20 Git Commands

git config

Usage: git config –global user.name “[name]”

Usage: git config –global user.email “[email address]”

This command sets the author name and email address respectively to be used with your commits.

git init

Usage: git init [repository name]

This command is used to start a new repository.

git clone

Usage: git clone [url]

This command is used to obtain a repository from an existing URL.

git add

Usage: git add [file]

This command adds a file to the staging area.

Usage: git add *

This command adds one or more to the staging area.

git commit

Usage: git commit -m “[ Type in the commit message]”

This command records or snapshots the file permanently in the version history.

Usage: git commit -a

This command commits any files you’ve added with the git add command and also commits any files you’ve changed since then.

git diff

Usage: git diff

This command shows the file differences which are not yet staged.

Usage: git diff –staged

This command shows the differences between the files in the staging area and the latest version present.

Usage: git diff [first branch] [second branch]

This command shows the differences between the two branches mentioned.

git reset

Usage: git reset [file]

This command unstages the file, but it preserves the file contents.

Usage: git reset [commit]

This command undoes all the commits after the specified commit and preserves the changes locally.

Usage: git reset –hard [commit]

This command discards all history and goes back to the specified commit.

git status

Usage: git status

This command lists all the files that have to be committed.

git rm

Usage: git rm [file]

This command deletes the file from your working directory and stages the deletion.

git log

Usage: git log

This command is used to list the version history for the current branch.

Usage: git log –follow[file]

This command lists version history for a file, including the renaming of files also.

git show

Usage: git show [commit]

This command shows the metadata and content changes of the specified commit.

git tag

Usage: git tag [commitID]

This command is used to give tags to the specificed commit.

git branch

Usage: git branch

This command lists all the local branches in the current repository.

Usage: git branch [branch name]

This command creates a new branch.

Usage: git branch -d [branch name]

This command deletes the feature branch.

git checkout

Usage: git checkout [branch name]

This command is used to switch from one branch to another.

Usage: git checkout -b [branch name]

This command creates a new branch and also switches to it.

git merge

Usage: git merge [branch name]

This command merges the specified branch’s history into the current branch.

git remote

Usage: git remote add [variable name] [Remote Server Link]

This command is used to connect your local repository to the remote server.

git push

Usage: git push [variable name] master

This command sends the committed changes of master branch to your remote repository.

Usage: git push [variable name] [branch]

This command sends the branch commits to your remote repository.

Usage: git push –all [variable name]

This command pushes all branches to your remote repository.

Usage: git push [variable name] :[branch name]

This command deletes a branch on your remote repository.

git pull

Usage:  git pull [Repository Link]

This command fetches and merges changes on the remote server to your working directory.

git stash

Usage: git stash save

This command temporarily stores all the modified tracked files.

Usage: git stash pop

This command restores the most recently stashed files.

Usage: git stash list

This command lists all stashed changesets.

Usage: git stash drop

This command discards the most recently stashed changeset.

I hope this helps out in your regular routine while working with git .Please comment down incase missed out any most usage command.

Introduction

I am Shiva Potlapelli, an adept Software Development Engineer in Test (SDET) with a comprehensive skill set in API, Mobile, and Web Automation. My technical repertoire includes advanced proficiency in a variety of tools and frameworks such as Appium, Cypress, Selenium, Playwright, and WebdriverIO, which I leverage to ensure robust and efficient testing across multiple platforms.

My expertise extends to both front-end and back-end testing, with a strong command over RestAssured and Postman for API testing. This, combined with my experience in Jenkins and Docker, enables me to streamline CI/CD pipelines, enhancing the efficiency and reliability of software deployment processes.

In the realm of cloud computing and CRM, I am well-versed in Salesforce and AWS, which allows me to integrate and test applications in cloud environments effectively. My programming skills are diverse, encompassing Java, JavaScript and Typescript which empowers me to handle a wide range of automation challenges with ease.

My career is a testament to my passion for quality assurance and my commitment to staying at the forefront of technological advancements in software testing. With a keen eye for detail and a relentless pursuit of excellence, I strive to ensure that every project I undertake meets the highest standards of performance and reliability.

Thanks to people in the QA community and My Manager Mohammed Fayaz for inspiring to create this blog .

For more info follow me on: https://www.linkedin.com/in/shiva-potlapelli/

Design a site like this with WordPress.com
Get started